Hello friends,
This time, I underestimated the amount of screenshots I was taking or would need. Rediscovering this game is an interesting experience. I'd forgotten how much complexity there is in battle interactions.
There's going to be some moments I simply don't show today as I try to reduce screenshot count. In the future, I think I'm adjusting my standard to "Two battles, as few screenshots as practical."

A set of new planets have been revealed due to our excursion on Mon Calamari. Three Imperial, three non-aligned. We'll get into more detail on the planets later. We want all of them, though. More money is always better in this game.

A quick shot of our current offensive force count.
Fleet: 8 Corellian corvette, 11 Assault Frigate mk. I, 1 Quasar Fire Carrier, a Fleet Commander, and the Sundered Heart.
Army: 24 Infantry platoons, 31 Plex Trooper regiments, 1 Field Commander, 4 Swamp Speeders, 19 T2-B tanks, 6 MPTL-2A artillery, 4 AAC-1 speeders, and 3 Y-Wing bomber squadrons.

The droids are back.
C-3PO: We did it, we did it!
C-3PO: Artoo has recovered the requested data from the Empire!

Mon Mothma: Your actions have set a shining example for the alliance, brave little droids. The technology you've acquired will go a long way to helping us in the fight against the Empire.
Mon Mothma took vague, but meaningful compliments as a feat last level. It's why she's the leader.
And yes, I am speaking canonically. In the old canon, the Alliance was formed of a vast number of factions unified, and unified only, by their dislike of the Empire. Mon Mothma's interpersonal skills kept the Alliance focused at the Empire instead of tearing its own throat out, and she kept it up for so long the Rebellion eventually transformed into the New Republic.
We don't get a lot of that in this game since we're not dealing with General Garm Bel Iblis or much with Alliance infighting at all, and Mon Mothma's presence is the reason for that.
Strategically, we're moving our fleets from Mon Calamari to Kuat because Kuat is now on our front lines. So logically, our next attack has to be made from Kuat.

C-3PO: Oh my. Thank you!
Last episode, we didn't discuss what the Alliance should do with Mon Calamari. So let's chat about that.
Mon Calamari is a world with two species. The Mon Calamari (Fish people) and the Quarren (Squid people). The Mon Calamari are like Admiral Ackbar from Episode VI, and the Quarren have only showed up in the EU. The Quarren live under water and the Mon Calamari live on the surface. In the Clone Wars, the two species generally disagreed on the role of the Republic. The Quarren generally sided with the Separatists, and the Mon Calamari wished to remain with the Republic.
For this reason, Mon Calamari was a major battlespace in the Clone Wars. It just doesn't look as devastated as some other worlds because A: That was twenty years ago, and B: On Mon Calamari, the battlefields were underwater.
For the Mon Calamari, loyalty to the Republic turned into distaste for the Empire. The Empire responded with harsh punishments and planetary occupation and enslaving both species, and the short version of this story is the Galactic Empire's colossal mis-management of Mon Calamari united both the Mon Calamari and the Quarren and their millenia-long conflicts in a burning, seething hatred of the Empire.
For us, the Empire's ridiculously terrible decision-making skills have given us a planet that will have access to the Rebel cruiser/destroyer/battlecruiser suite later. And discounts our basic cruiser. And has better income than Alderaan despite not having the "High Credit Income" advantage. And provides a ton of partisans in tactical battles.
In the base game, it's not uncommon for Mon Calamari partisans to fend off small Imperial forces by themselves.
Ultimately, we're taking advantage of the credit income. We'll mass-produce mining facilities here, and get the space station up.

Pictured: Mon Mothma interrupting our tech theft. Look, I know you, like, are my boss, but...actually, no. Never mind. You go ahead. You are my boss.
Mon Mothma: We have not received the intelligence we hoped for on this Imperial Superweapon. The Empire must have hidden the information well.
Note we have six new planets on the map. We'll cover them soon.

Antilles: Well, the droids can continue to look for it. In the meantime, we do have other channels to go through for information...
Mon Mothma: Indeed. I have been reluctant to make use of those sympathetic to our plight, but I believe we have no other options. I will contact our friends in the senate.
Suddenly, us only having three worlds at the campaign beginning makes a lot more sense. This is war, Mon Mothma! Do you want to restore the Republic? Well then we need not just one, but multiple military victories over the Empire. Reasoned discussion simply doesn't work with Palpatine. If you wanna try it, make sure to wear a fucking rubber suit. We need every advantage we can get!
But we probably shouldn't use every advantage. We don't need to try to resurrect the Mass Shadow Generator, though it would be awesome.
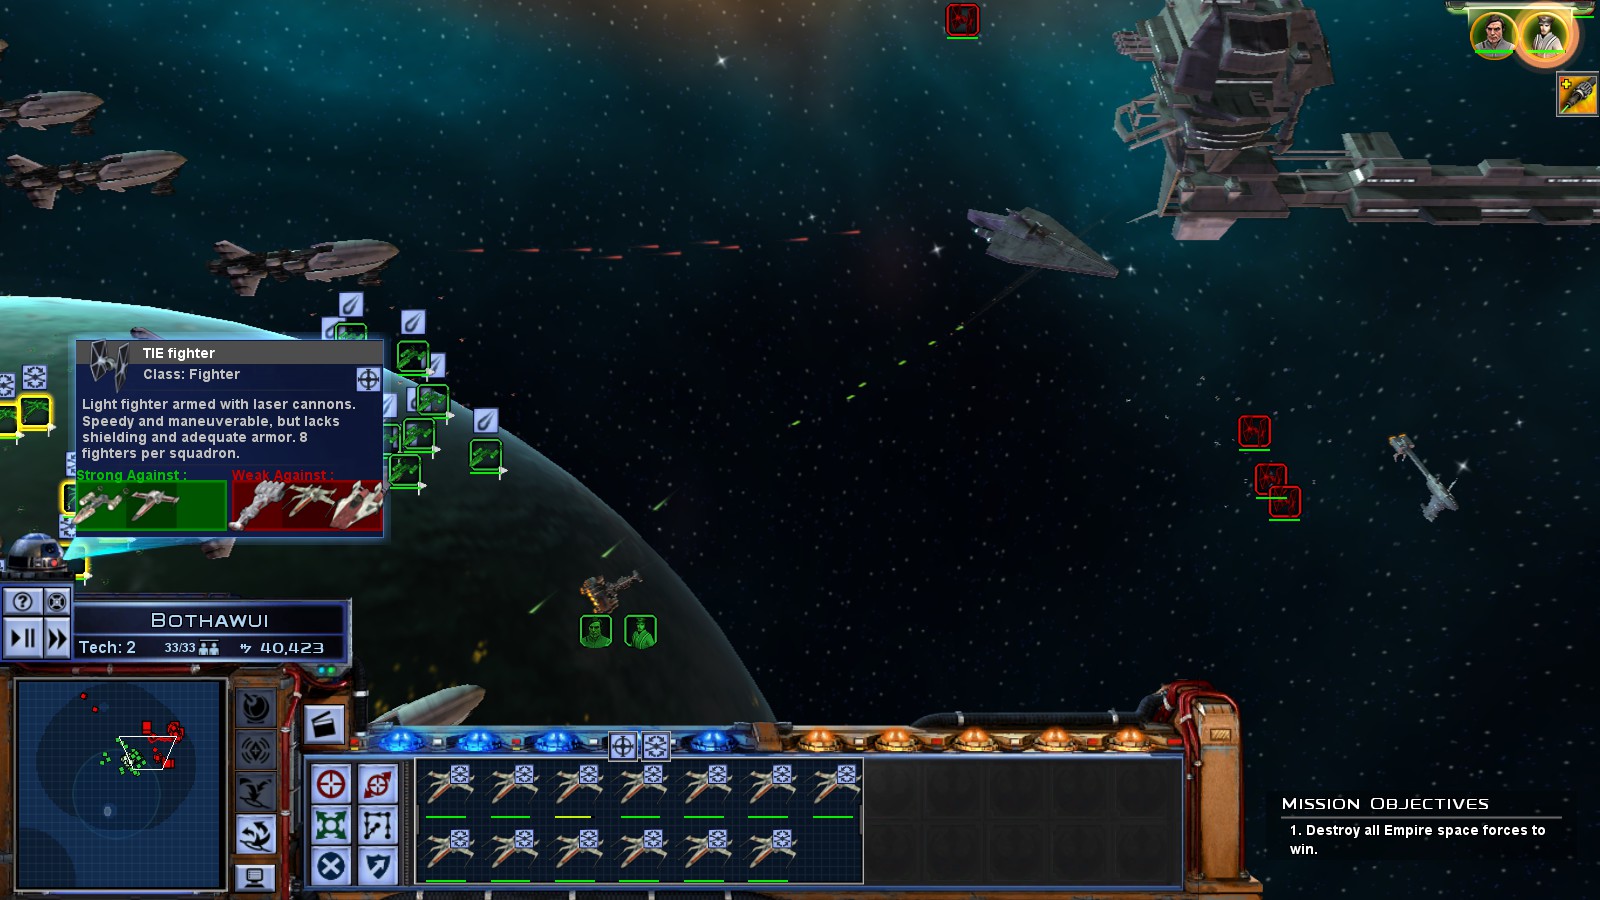
So this is Bothawui!
The Empire has this system locked down. Space station, picket fleet, and three garrison-producing structures on the surface. One of those structures is a medium factory, meaning AT-STs. Along with a moderate-sized force currently on the surface.
If we were smart, we'd take Bothawui's orbit and hold off on the ground assault until we have T3-Bs to force it.
If we were smart.

A lot of the same considerations from last update apply to our technology. We're nabbing the Corellian Gunship. Short-term, there's a lot to be said for fast attack ships that ignore shields. Long-term, we will need them to counter TIE Defenders.
Mon Mothma: The Empire is in a stir about events unfolding on Kashyyyk. It appears that wookies are being freed by a former Imperial soldier turned rogue smuggler. We're intercepting a transmission from the planet...
Oooh? That's interesting. The soldier. I bet she's seven feet tall and a badass! Ooh, and with glowing silver eyes and hair!

Han Solo: ...Don't care where he said he was, he's not there! No, I can't ask them - they're shooting at me! Yeah, yeah, I'll keep looking.
Or it's this guy. Han Solo.
Mon Mothma: Whatever his motivation, he's liberating wookies from Imperial slavers, and we should assist to that end. Assemble a force and take it to Kashyyyk with haste!
So, on Han Solo. He made an impression in A New Hope, but not the right impression. The audience gathered from him that he was generally good-hearted and extremely competent. The truth is that he was originally intended to be seen as a liar, swindler, and generally useless...but to come through in the end.
The famous "Made the Kessel run in less than 12 parsecs" was intended to be Han's ridiculous lie using a word he doesn't know the meaning of to try and impress Ben Kenobi. The truth being that since a parsec is a unit of distance, this can't possibly be true. Furthermore, during the escape from the Death Star, Luke shoots down most of the fighters, and Han is generally useless during the infiltration with his actions making every situation go from bad to worse. Specifically...failing to talk the Imperials into not sending a security team to the detention area, firing a blaster in a room with walls that reflect blaster fire which was obvious enough for the torture-disoriented Princess Leia to notice, and chasing down retreating Stormtroopers without realizing that the Empire would have limitless reinforcements on the Death Star. Oh, and being a crappy enough smuggler that he didn't do a sweep for homing devices.
Our strategy: Mon Mothma tells us to quickly go to Kashyyyk and free wookies. We have a good reason to do this because Kashyyyk is a neutral world and the Empire will eventually take it and establish a base and the battle will become ten times harder.
Or....we can look at the map. Kashyyyk's position only has one bordering Imperial world: Bothawui. Yeahhh. Gordias called, they have a knot they want me to look at.

So, Bothawui. Let's go.

How glorious.

Naturally, we group our units up. We're up against a space station this time, so a minimum of sixteen starfighter squadrons. 6 fighters and bombers from the station, and two each from the garrison frigates. Our X-Wings are going to get a bit of a workout.
While we're at it, we send the Quasar Fire to go hide in the corner of shame. It's sort of like what you do with a kid who won't behave, only it's standard tactical doctrine for carriers in most games.

So it begins. Let me show you something interesting about X-Wings. X-Wings can trade firepower for movement speed much like Corellian Corvettes. However, there is one critical difference.
Corellian Corvettes apply this trade for a set amount of time, and then it takes a while to recharge. X-Wings can freely swap between movement mode and normal mode at any time with no cooldown. And X-Wing firepower in movement mode is not bad, it's just more equivalent to that of a Z-95.

TIE Bombers are bog-standard bombers. They're slow and unshielded with no special abilities...but they fire proton torpedoes that penetrate the shields of larger ships.
Against X-Wings, they stand no chance.

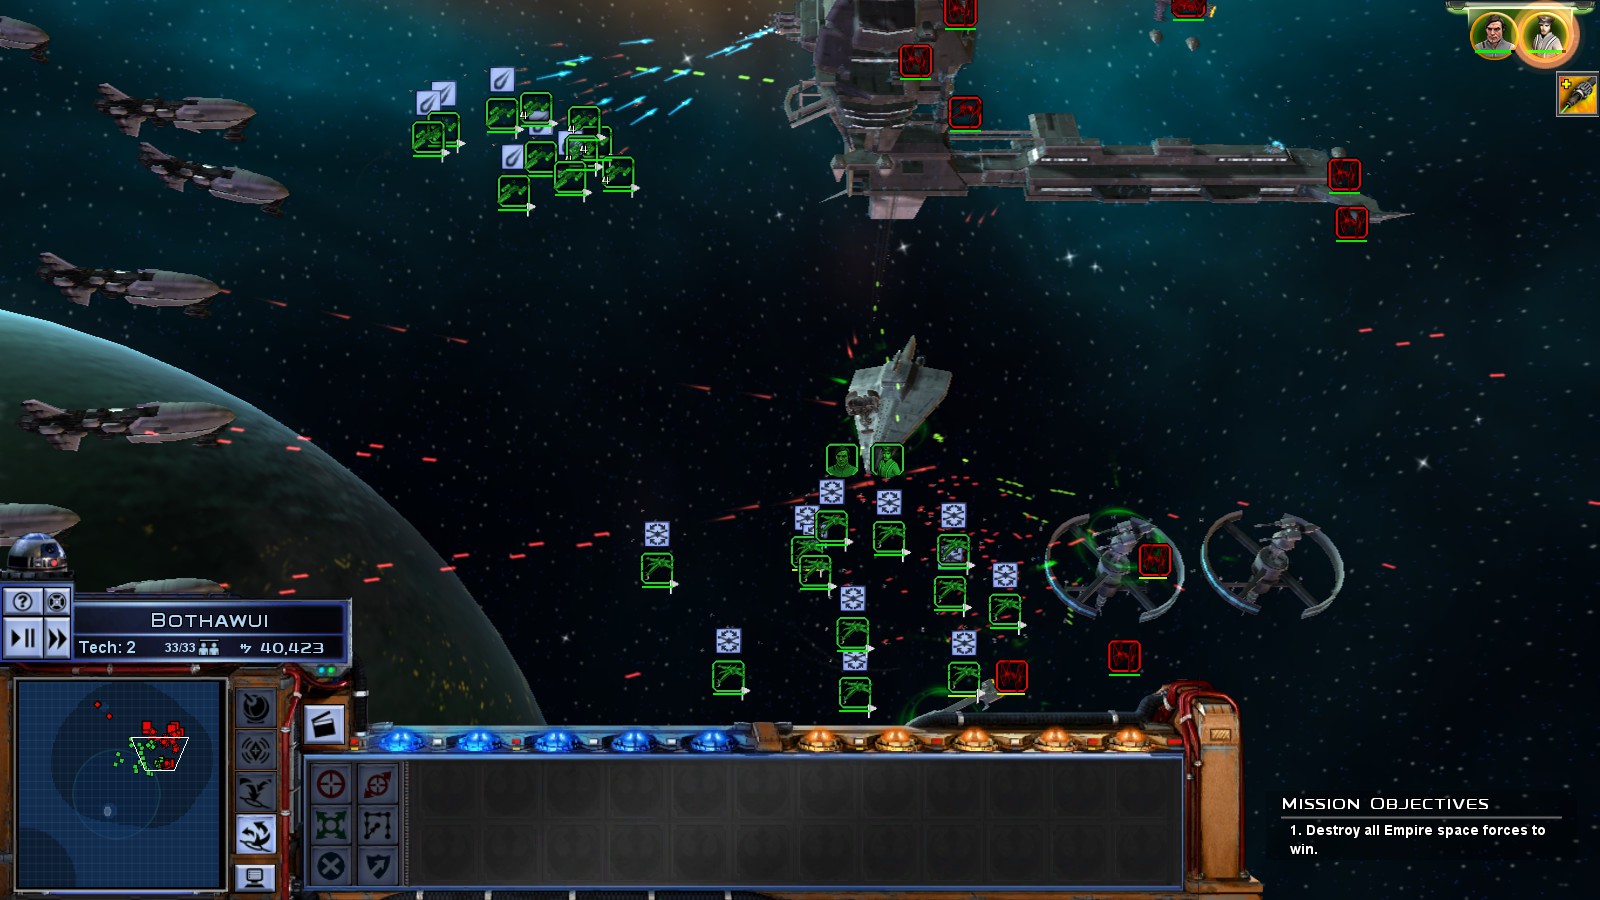
This is a demonstration of the main problem with frigate-heavy strike fleets. With so many frigates on the map, we cover most of the available space. So if we maintain force concentration with our fighters, we leave some frigates - usually at either end of the line - undefended. But if we task a squadron of fighters to protect each frigate, we usually don't have the firepower to actually kill bombers in a reasonable timeframe.
In situations like this, we have to make sacrifices. Let the enemy chew on one or two frigates while we protect most of them.
The frigate in this picture is firing its laser cannons, which have perfect accuracy against starfighters. Since TIE Bombers are unshielded, this is actually fairly effective. Not effective enough to save this frigate if it was operating alone, but effective enough that strikecraft operating in isolation should target hardpoints in this order:
If mixed fighters and bombers: Shields > Concussion Missiles > Laser cannons > other lasers > engines > final blows
If pure bombers: Hanger > engines > Concussion missiles > laser cannons > other lasers > final blows
If pure fighters: Engines > concussion missiles > hanger > laser cannons > other lasers > final blows
If strikecraft are operating for fleet support, it begins to depend on what exactly your fleet is made up of. For a frigate fleet like ours, there's a lot of value in our Y-Wings moving from enemy ship to enemy ship only targeting engines and shield generators. If the enemy had something like a destroyer, the best use for our Y-Wings would be targeting the most powerful enemy ship to the exclusion of all else.

An alternative to splitting up fighters to protect your frigates is to have a squad of corvettes that hangs back to protect the fleet against things like this.
A third option is to use bombers to intercept bombers. Bombers can absolutely kill strikecraft, they're just a lot worse at it than either fighters or corvettes. Bomber vs bomber, this kind of evens out.

These two Tartans rolled right up and started shooting, and we just didn't stop moving forward. The X-Wings got back here really quickly because of the S-Foils thing.
Even with their power to weapons, we have too many frigates, too many turbolasers. Surround and destroy.

Inevitable.

We have useful data on the Imperial space station! And something interesting.
Visible here are a bunch of TIE Interceptors, some TIE fighters, and an acclamator. But also a Nebulon-B frigate.
You may recall the Nebulon-B frigate earlier as a ship we can build as the Rebellion. In the base game, the Nebulon-B is a Rebel exclusive ship that stands opposite the Imperial Acclamator cruiser. However, unlike many other unit types the Rebellion uses, the Nebulon-B is in rebel service because canonically the ship is extremely common and available for legitimate purchase. So why would only the Rebellion use it?
In AEM, the Empire gets a special Nebulon-B variant, the Nebulon-B2, as their tier I frigate. This variant has Power to Weapons instead of Power to Shields, so it better fits Imperial tactical doctrine. However, the Empire can build the normal Nebulon-B on Byss, including access to Power to Shields. The Nebulon-B is a weak enough ship that the main reason to do this is if you really need Power to Shields in your strike fleet, or if you just want the unit for personal reasons, though.
Strangely enough, both Imperial and Rebel level 2 space stations summon Nebulon-B frigates as garrison ships.

We split our forces up by target. The frigates are to target the Deneeta's nose and blast that missile launcher off it. The corvettes are targeting those starfighters by the Acclamator, and the Y-Wings are using their special on the Space Station. The X-Wings are dealing with another group of TIE Fighters.
However, the Imperials move their forces around. So we need to adjust our plans. We send the X-Wings up north now, and bring the Sundered Heart forward. It's ability weakens both of those frigates.
Our Y-Wings use their Ion Cannons! This will temporarily cripple the rate of fire of the many and various weapons mounted on the space station. The bombers then launch a massive torpedo barrage at the space station's shield generator, which will let our frigates pound it to scrap.

Unfortunately, now our Y-Wings are vulnerable to those automated defensive satellites and those fighters. But that's just a thing that has to happen right now.

These are IPV-1 Patrol Craft, part of the space station garrison. These are tier I corvettes. Technically, these ships are usually used by Imperial customs officers, which helps explain their general uselessness in fleet battles.
Tartans and Corellian Corvettes simply melt enemy fighters. IPV-1s just fire a lot. We can build these on Kessel, and we probably will. If we only built good units, this would get dreadfully boring.

We go ahead and switch the X-Wings back into normal mode. I think we're done with cross-map charges for now.

The Sundered Heart has actually taken a beating. We pull her back and find some other place for the corvettes to intervene.

At this point, the Imperial fleet has completely shattered. There's no co-ordination of any kind going on.

The Empire does what they should have done much closer to the beginning of this battle: Launch a mass strikecraft attack. The TIE Fighters aren't really a problem. Those TIE Bombers are going to be a problem, however.

We're about close enough to the enemy that standing in the airlock with a shotgun is starting to look like a good idea.
A note on explosions: In the vanilla game, Rebel starships explode orange, and Imperial starships explode blue. Here, it's kind of random which ship explodes what way. Both Imperial frigates are still alive because we're not actually concentrating fire right now. We're using our frigates as an expression of battlespace control, not as attack units.

This is the main problem with frigate lines. At least one ship is going to be uncovered, and if the enemy hammers her...
Well.

She was only unprotected for a few seconds, but she's already lost two of five hardpoints, and the others have been beaten on. Hopefully the corvettes can handle this. We may sweep TIE Fighters and TIE Bombers aside easily most times, but in the right situations and the right hands these units ARE lethal.

We vaporize the bombers first. They have the best damage output against frigates, and fire through shields. We have power to shields, so we can quickly regenerate shields and leave the TIE Fighters as irrelevant.

Also, I just love the way ships actually do take damage and show that in this game. Accalamators lose chunks of starship, but rebel ships just start belching smoke even though that really shouldn't work in space.
A badly damaged star destroyer looks like a partially eaten cookie.

Last Nebulon-B explodes to the right, while the last IPV-1 explodes in the center. Two squadrons of TIEs.

We give this one to both the X-Wings and Y-Wings.

Battles get more intense the further we go into the campaign. And more complicated, especially in AEM.
This is basically the norm for space battles in AEM. We send our frigates forward, and do the best we can. If we were facing a more powerful opponent, we'd have needed a different tactic than just constant attacking, but we work with the threat we have.

We begin with some infantry. This is going to be an uphill battle.

This is another one of those worlds where the Empire's ridiculously terrible decisions are strictly beneficial for us.
Bothan culture is based around the exchange of information, so several factions on the planet have thought nothing of selling information about the Empire to the Rebellion. The Emperor responded by personally going to Bothawui and slaughtering Bothans at random.
So naturally, we have partisan support for our fight against the Empire, though I expect Bothawui to be a political problem after the victory.

This is a mercenary outfitter. It provides a few small upgrades. Specifically, it immunizes our units against planetary weather in this battle, and slightly improves the defense of T2-Bs and Rebel Infantry. We need every advantage we can get right now.

Our strike force today consists of a crapload of tanks, a mix of infantry and plex, Bothan partisans, and our rockstar, the artillery.
Visible here is an AT-ST. We've fought these before, but previously we've overrun them in seconds. Today we're going to learn about the power of AT-STs.

The partisans make an attempt to grab this landing zone, but are slaughtered en masse by a tank and some stormtroopers.

MPTL artillery come with small drones. These drones can ping parts of the ground map to reveal it.
The main limitation of bombing runs is that they can only be targeted on areas you can see. 2 + 2 sometimes does equal 4.

The ping reveal fades in less than ten seconds, but you can see explosions through the fog of war. It's the only way to evaluate damage when you can't see what's going on.


We finally get our mechanized forces rolling out properly. Right now, the T2-Bs are doing their T2-B thing, but that won't last.

There's an AT-ST to the south using its special ability on our tanks.
The AT-ST special is to target an area of ground and scatter-fire across the area. In vanilla, the AT-ST's scatter-fire damage is negligible, so against any single unit its a really bad idea. But against enough units, it multiples the AT-ST's total damage. However, you can beat them with plex troopers.
AEM changes things. AT-ST damage is increased many times over, so AT-ST scatter-fire can inflict the damage you see in the screenshot in about 15 seconds. This is why you do not want to fight AT-STs with T2-Bs. You will lose dozens of T2-Bs to a single scatter-fire from a single AT-ST unless you're morally courageous enough to run away and smart enough to set up an alternative to direct engagement.

Such as a bunch of artillery set up to cover your fall-back point. AT-STs are really tough, but combined fire from multiple MPTL-2As can and will bring the bastards down.
The storm is also quite appropriate for this battle.

Our infantry stands in the north. Our current plan is for the infantry to hold the ground, while the tanks and artillery punch through to the base and raze those buildings before the AT-ST swarms destroy us all.

*hums a jolly tune*

Turns out we accidentally blew up their officer academy with that bombing run earlier. See, this is why bombing runs are awesome. Indiscriminate destruction, whoo!

Unfortunately, we don't get to hum Ride of the Valkyries this time. There's a single anti-air turret somewhere in this area that shot down all of our Y-Wings in about a second. Anti-air guns are really cheap and about this powerful. If you're not using turrets to protect your base, then bombing runs and the apocalyptic damage they do is on you.

I send a hail of burning ice, on every village, every town...

I am the scourge, I am the sword...

Whew. I have no idea what came over me. Unfortunately, though it looks like we can hover over that area to the west, we actually cannot. So we just do what we can, blowing up tanks and turrets and gaining some ground against The Empire.

This battle will last until we run out of units unless we just punch the Empire out.

We need to do this, and NOW. Our tanks are really running ragged.

Ugh. Power Generator is located inside the shield it powers. This is smarter than we can usually expect the Empire or most fictional forces to be.
Unfortunately, shield generators also protect against bombing runs. You can't target a spot covered by a shield, and the shield will stop bombs.

Fortunately, we have four ping drones. We can just spam pings until we find a target we can strike.


Also, we definitely missed an anti-air turret. We're really doing a number on our Y-Wings this battle. At the very least, they fear me more than death. That's something.

In WWI, there were many fundamental misconceptions in tactics and technology essays could and have been written about. But one thing that happened is that offensives occured in the wake of something called a "Walking barrage".
A "Walking barrage" was when the artillery conducted bombardment of a space directly in front of friendly soldiers, and then "walked" that barrage over towards the enemy while friendly forces advanced. The closer the barrage was to friendly units, the less time they'd have to deal with fortified enemy positions when the barrage ended and the time came to charge. Most successful uses of the Walking Barrage caused friendly casualties, sometimes in excess of 5% of the total attacking force!

So many shells were dropped between France and Germany during WWI that the soil composition was altered, and different types of plants grew on the post-war battlefields.
What we're using here is a modified version of the Walking Barrage, adjusted to fit the technology, objectives, and tactical realities we face.
We're advancing to the edge of our mobile artillery's ability to effectively support us, then pulling the artillery forward. We're able to do this very quickly, partially because our tanks are much faster than anything in WWI, and partially because the Empire can't dig in the same way. Entrenched forces in WWI were actually very well protected against anything short of a direct hit from artillery, and over ranges of 20 miles or more direct hits were extremely rare.
The Empire can't construct the same sorts of fortifications, and even if they could, the guided munitions of the MPTL-2A not only can but usually do score direct hits regardless of range.

Of course, all that falls apart if the Empire manages to sneak something behind us and smash the artillery.

We're having the tanks stand their position right now. We're bringing up Bothan partisans to take those build pads. Some turrets would really help us bottle the Empire up.

Meanwhile, the anti-air in the north is really throwing off our bombing run groove. The infantry are going to go deal with it.

See the squat turret on the right? That's anti-air. The one on the left is anti-vehicle.
Scry and die.

See the expanding clouds of debris? Our Y-Wings. Anti-air turrets are potent enough to kill an entire wing of bombers heading towards a single one of them. This is actually essential for balance, though it makes me wonder why anti-air turrets aren't mounted on Tartan corvettes or the like.
They're less ridiculous against atmospheric fighters, but that's a lesson for the future.

So I guess we just have to send the infantry to do things the much harder way. Ah, the poor bloody infantry.

One AT-ST put all these soldiers on half health or worse in about ten seconds. The second AT-ST is going to kill all of them.

The weakened infantry take hideous damage from the anti-vehicle turret before knocking it out. Then it's the anti-air turret.
Also note the AT-ST using scatter-fire on our infantry. But the bombing run is about recharged. Just a few more seconds...

Fuck. FUCK THIS. We are taking too long!

No more respawning 2-Ms!

Tanks vs anti-vehicle turrets without artillery support. We can win this.

It's tempting to go after the AT-ST factory, but our target is either the shield generator or the power generator. With either one of those gone, worst case we can pick the other buildings off piecemeal.

We found our target. And substantial opposition without our artillery. We just have to trust in our tanks right now.

The shield is down! Fire, fire now!

Knock that fucking thing down before we have to deal with another chicken walker!

We lose yet another tank. But we take out the factory and walker.

Six. Six survivors among our tanks.
Out of 16.

We call in the second wave. T2-Bs as escorts, AAC-1s to demonstrate what they do.

See the little flaming balls? That's flak. It's fired from the AAC-1s. It's ineffective against all ground units, but it deals area damage (So it is actually good against infantry), ignores shields, doesn't need to score a hit to inflict full damage, and fires rapidly. It's also surprisingly effective against structures. AAC-1s may be intended for anti-air use, but they have a rather nasty sting if you try and take liberties with them.
They're also rather fast and hover.

We ignore the last two enemy structures and focus on blowing up the turrets.

We also bring down a Swamp Speeder unit to capture build pads. I'm so pissed off at this entire battle right now that I resolve to build an Anti-Vehicle turret on every single build pad on this map. And I do.


Appropriate music: Wagner


Yeah. Our casualties were much heavier, especially among the tanks.

We have control, though. And that's what's important right now.
At this point, the Empire can no longer make Kashyyyk harder for us when we do it, and the only world of ours they can possibly attack is Bothawui. So we have a strong incentive to fortify Bothawui heavily, especially since we'll probably be sitting here for a bit.

What are we going to do with Bothawui? We're gearing this world up to defend against attacks. We're building an officer academy and a barracks.
Let's go over the other worlds we can take.

Tatooine is the home world of Darth Vader, which someone thought was a good place to hide Vader's son on without changing the son's name in any way.
Tatooine offers us a pretty great bonus to our T2-B tanks, but it has windy weather that favors the Empire over us.

Geonosis is the world where the Separatist cause really began, and the first battle of the Clone Wars. It's a powerful industrial planet and I can think of no better place to mass-produce T4-B tanks later on.

Additionally, it makes our artillery cheaper.
And in AEM, Geonosis and other separatist strongpoints allow recruiting and building Separatist units. Since the Providence, Recusant, and Lucrehulk are (respectively), cruiser, destroyer, and battlecruiser class capital ships, this makes Geonosis a de facto capital ship planet even though it won't build the Alliance capital ships.
I approve of the ability to build these ships, and to build droids on Geonosis' surface. These units would not have just disappeared at the end of the Clone Wars, and should have found their way to Alliance service.

Ryloth is the home world of the Twi'leks, who are represented in Star Wars mostly as criminals and prostitutes due to the various bullcrap that infects portions of the Expanded Universe.
It's nothing special as a planet, but the income is decent, and denying the Empire that Stormtrooper bonus is worthwhile in its own right.

Nal Hutta is a very interesting planet in that it's the only world in Empire at War with a randomized daily income.
Yes, randomized. The income changes every day.

Shola is an interesting planet to fight on in that it cooks infantry to death. I think we have the tools to take it, however.

Strategically, we're almost certainly taking Nal Hutta, then Shola, and then dealing with Kashyyyk.
Nal Hutta and Shola can't be attacked from Geonosis, and no matter how we slice it the next Rebel mission is going to involve all-out back and forth war across the southern rim. Our next objective is moving the long-awaited T3-B tanks up to the army, and then going after our specified worlds.
We should expect an Imperial counterattack soon and very soon, and it would be foolish to believe Bothawui could possibly stand on its own.
Other than that, we are in a good position.
No comments:
Post a Comment